Why 301 Redirects are Critical for Your Next Website Redesign

A 301 redirect is an HTTP status code that redirects users (and search engines such as Google) from one page to a different one on your site.
301 redirects play an important role in any website — acting as directors of traffic around your site and ensuring the traffic and SEO value from old or depreciated content carries over to other posts and pages.
They insure that website visitors can find the content they’re looking for and that search engine bots have up-to-date information about where various pieces of content live on your site.
During a website redesign — or really during any form of website upgrade or maintenance — pages will naturally be created and deleted to better align the content of the site with the business’s current structure and digital goals.
For this reason, a general understanding of what 301 redirects are, how they work, and why they matter for your site’s health and performance is essential for ensuring your website remains in tip-top shape for as long as possible.
301 redirect basics
301 redirects are a powerful tool for ensuring that visitors to your site reach the content they need as quickly and easily as possible. Specifically, the Mozilla Developer Network web docs define a 301 redirect as follows:
The HyperText Transfer Protocol (HTTP) 301 Moved Permanently redirect status response code indicates that the requested resource has been definitively moved to the URL given by the [redirect’s] Location headers. A browser redirects to the new URL and search engines update their links to the resource.
Breaking this down a little, imagine that you have a page titled “Careers” hosted at https://example.com/careers/. However, you believe that your audience would react better to a page titled “Join Our Team,” and want to update the URL to https://example.com/join-our-team/ to better match the page’s title.
To follow through on your plan, you change the slug of your page from /careers/ to /join-our-team/ — but now what happens when someone tries to visit the old /careers/ page, either through the still-indexed page in their search engine of choice or through a backlink from another page?
By setting up a 301 redirect from the old /careers/ page to the new /join-our-team/ page, you can automatically forward any traffic that lands on the old page to the new one — ensuring a seamless experience for your visitors.
Search engines such as Google will carry any SEO value from the old page to the new page — meaning you won’t lose any keywords or rankings post-switch, and will also avoid having to wait for Google and other search engines to index your new page (i.e. it goes live and is displayed in search effectively immediately).
Why use 301 redirects for website refreshes and redesigns?

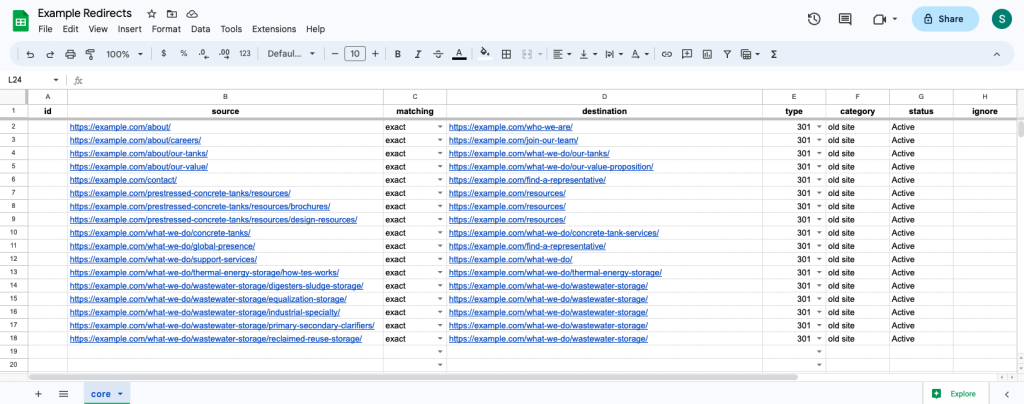
A screenshot of an example 301 redirect spreadsheet that we might make for a website redesign project. This sheet is formatted for RankMath’s import feature, and would be exported as a .csv file before being uploaded to the site.
When you redesign or otherwise make major adjustments to the URL structure or architecture of your website, you may need to change the URLs of various pages and posts. If you fail to set up the proper 301 redirects, search engines won’t know where to find the new pages, and your traffic will plummet.
Further, as noted above, you will lose any SEO value generated by your prior pages, effectively lowering your website’s value in the eyes of search engines such as Google and all but ensuring the loss of any relevant keywords those pages ranked for.
For this reason, it’s generally a best practice to create a spreadsheet near the end of the website redesign process that details what pages you’ll be redirecting and where those redirects should point to. It’s not uncommon for these spreadsheets to range from around twenty rows to several hundred rows long, usually depending on if you’re changing the URL structure of your blog posts, projects, or other content marketing assets.
How to implement 301 redirects

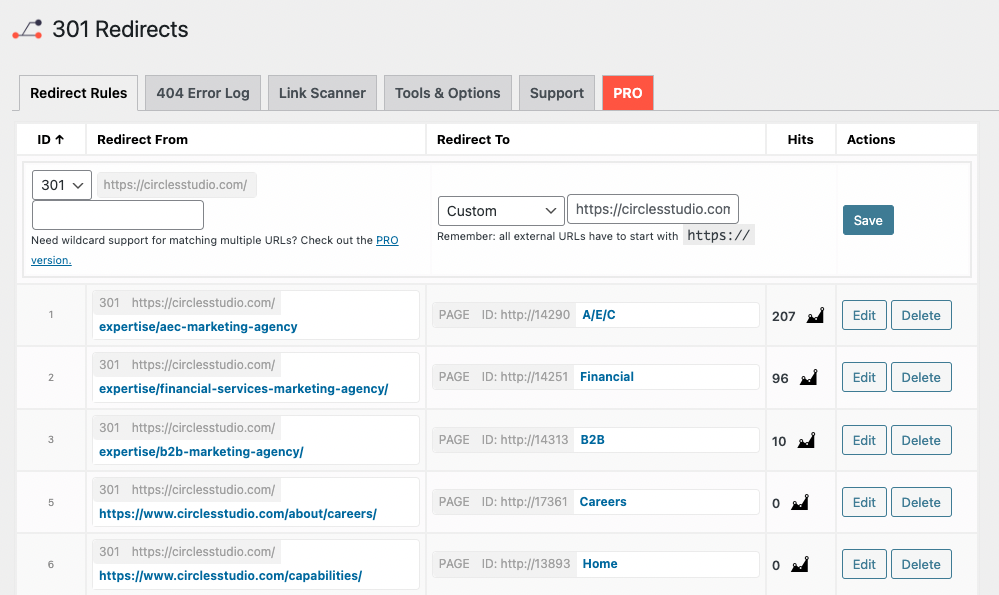
A screenshot of the 301 redirects plugin, which we use to manage redirects on our main circle S studio website.
There are several ways of implementing 301 redirects on a website, ranging from slightly more technical processes like editing your site’s .htaccess file to more user-friendly solutions such as using a redirect plugin:
- Editing your .htaccess file — The most direct way to set up redirects is to add a new line to your website’s .htaccess file, which you can edit using SEO plugins such as Yoast or RankMath, or through other means. This solution is the most direct and common way for developers to set up redirects, but lacks the dedicated user interface found in other solutions, while also requiring a small amount of technical knowledge about website development.
- Using a plugin — In most cases, we recommend that our clients set up redirects using plugins, as this solution offers the greatest amount of flexibility while retaining the same speed and technical effectiveness of editing your .htaccess file. Common solutions include RankMath SEO’s redirects module, Yoast’s Redirect Manager, and WebFactory’s 301 Redirects plugin.
- Creating a rule at the hosting level — Sometimes in website redesign projects, you’ll want to move from one domain to another (such as an abbreviation of your business name or a custom top level domain or TLD such as .group or .design). Generally speaking, there are two methods of setting up redirects in this scenario. First, you would set up normal redirects on the old website using a plugin as noted above, sending all traffic from your old domain to the comparable page on the new one. This means that you’ll have to keep paying for hosting the site for the sole purpose of redirecting traffic to the new domain. Then, after leaving those redirects up for a year, it may be worthwhile removing the old domain entirely to save on hosting costs — at which point you can set up redirect rules at the domain level with whatever service manages your actual domain and DNS settings (such as GoDaddy or Google Domains).
4 best practices for using redirects effectively in a website redesign
When implementing 301 redirects, it’s important to follow best practices to ensure a superior visitor experience and that your SEO equity is preserved:
Redirect to relevant pages
When redirecting a page, make sure the destination is relevant to the original page’s content. This creates a better user experience and ensures that users find what they’re looking for. Try to avoid sending users to irrelevant pages (such as redirecting a blog post to your careers page) or setting up multiple redirects to a new page in an effort to quickly boost its rankings. If you find that there is no clear destination for the traffic of a deleted page, consider simply redirecting the content to your home page instead.
Update internal links
After you implement a new 301 redirect, make sure to update all internal links on your site to point to the new URL. This ensures that users and search engines are sent to the correct page as quickly as possible, and generally helps to ensure your site is clean and clutter-free. Remember, the purpose of a redirect is to ensure that external traffic can quickly and easily find content on your site that has moved. Ensuring that there are minimal redirects on your website is important for improving page load times and Core Web Vital stats.
Keep redirects in place indefinitely
Once you’ve implemented a 301 redirect, it’s generally a best practice to keep it in place indefinitely. This ensures that all traffic is redirected to the new URL and that your SEO equity is preserved. While Google’s Gary Illyes has stated that it only takes around a year for link signals to pass equity to the new URL after a redirect, there’s no real reason to remove the redirect from your site once it’s in place.
Follow up on 404 errors
A 404 error, like a 301 redirect, is an HTTP status response code that servers will return to users when they can’t properly display the requested content. However, while the 301 redirect status is the server saying “hey, this content was actually moved over here,” a 404 error is the server saying “sorry, we couldn’t find that content, try again somewhere else!”
Most plugins that support 301 redirects will also have a page showing any 404 errors your users ran into while viewing the content on your site. Generally, it’s wise to review this page every week or two to identify any areas where users are landing on a page that returns a 404 error, as this might indicate a problem with your current redirect map or another issue with your website. Often, the solution to this problem is to simply set up a 301 redirect from the current 404 page to the most relevant live page on your site.
Soften the transition to your new site by setting up 301 redirects
301 redirects are essential for retaining SEO equity after a website redesign or refresh. By using 301 redirects, you can ensure that all traffic is redirected to the new pages and that your SEO equity is preserved. Make sure to follow best practices when implementing 301 redirects to maintain your site’s rankings in search engines.
"*" indicates required fields
By signing up you are agreeing to our Privacy Policy.